Logo

Slackware make uses of the UW (University of Washington) IMAP server. This was probably once a good choice, but not any longer, since there are better IMAP servers available.

I use the Horde framework with IMP, the Internet Messaging Program. IMP is written in PHP and provides webmail access to IMAP and POP3 accounts. Unlike previous versions of IMP, 4.1+ no longer contains the "namespace", "hierarchies", or "folders" parameters. Instead, namespace configuration is automatically detected from the remote server.

This startles users of UW-IMAP because all files in the home directory now show up in the folders list and all sorts of namespaces appear that didn't appear before. Additionally, this results in drastically increased login times to IMP.

In fact, this is not a IMP problem, it is a UW-IMAP configutation problem. The problem has been known for a long time, still there is no easy workaround for this.

Some day I decided to move to Dovecot, an open source IMAP and POP3 server. Dovecot primarily aims to be lightweight, fast and easy to set up and has been written primarily with security in mind. Dovecot can work with standard mbox, Maildir, and its own dbox format. It is fully compatible with UW IMAP and Courier IMAP servers.


Steps to move

Move to Dovecot takes only a few steps:

  1. Get Dovecot sources or even better, grab the Slackware Dovecot package from Piir-Stuff
  2. Install the Dovecot package
  3. Adjust the configuration file "dovecot.conf" in /etc
  4. Make adjustments to fire up dovecot


Dovecot configuration file

You find the dovecot configuration file in /etc/dovecot.conf. If you're in a hurry, see http://wiki.dovecot.org/QuickConfiguration. Otherwise, proceed trough the options step by step and adjust as needed.

For the complete dovecot documentation visit the website.


Options in dovecot.conf

Example settings (grep -v "#" /etc/dovecot.conf):


# Only do this in combination with TLS / SLL. Otherwise, your password are in severe danger!

disable_plaintext_auth = no


# TLS / SSL - see dedicated section in this article

ssl_cert_file = /etc/ssl/misc/dovecotcert.pem
ssl_key_file = /etc/ssl/misc/dovecotkey.pem
ssl_ca_file = /etc/ssl/misc/demoCA/cacert.pem
ssl_verify_client_cert = yes
ssl_cipher_list = HIGH:MEDIUM


protocol imap {
}

protocol pop3 {
}

protocol lda {
postmaster_address =
}


# Authentication section. I still use shadow and passwd. Last part in this section provides SASL for the Postfix mailer. See dedicated article.

auth default {
mechanisms = plain login

passdb shadow {
}

userdb passwd {
}

user = root

ssl_require_client_cert = no

socket listen {
client {
path = /var/spool/postfix/private/auth
mode = 0666
user = postfix
group = postfix
}
}
}


dict {
}

plugin {
}


Set up TLS / SSL

I use TLS to secure my passwords and mails in transport. To do so is a three step process:

  1. Get a server certificate
  2. Adjust dovecot.conf
  3. Check your mail client for the presence of the CA certificate


Get a server certificate

You can use a "official" certificate or go with your own CA and certificate. You may want to use a "official" certificate in a productive environment with different parties accessing your server. This is not a must, but you would have to assure the proper distribution of your CA certificate to all parties accessing your server.

For a list of authorities providing official certificates, have a look in the authorities certificate section of your web browser.

If you prefer to go with your own CA and certificate, refer to the dedicated article (OpenSSL CA) on Piir-Stuff.


Adjust dovecot.conf

To enable TLS, adjust your dovecot settings correspondingly. The authentication section is not mandatory and only required if you want to use client certificates for authentication.


# This is the server certificate - either a self made or official certificate
ssl_cert_file = /etc/ssl/misc/dovecotcert.pem

# The server key file
ssl_key_file = /etc/ssl/misc/dovecotkey.pem

# The certificate of the issuing CA - the obe the server certificate is based on
ssl_ca_file = /etc/ssl/misc/demoCA/cacert.pem

# Encryption strength - the higher, the better
ssl_cipher_list = HIGH:MEDIUM


# Authentication section
# Whether client certificates should be used and forced
ssl_require_client_cert = no

# Whether client certificates should be verified
ssl_verify_client_cert = yes


Check your mail client for the presence of the CA certificate

you will receive a waning notice, if the CA certificate of the issuing CA is not in the authorities store of your mail client. In order to avoid this, check the authorities store of your mail client. If it is missing, get the issuing CA certificate and import it.


Fire up dovecot

You can do this either by inetd or a startup script from /etc/rc.d

Option 1: inetd

Disable the original UW IMAP daemon and have the new Dovecot daemon in /usr/libexec/dovecot started.


#imap2 stream tcp nowait root /usr/sbin/tcpd imapd
imap2 stream tcp nowait root /usr/sbin/tcpd /usr/libexec/dovecot/imap-login


Option 2: Startup script from /etc/rc.d


#!/bin/bash
# Copyright 2006, Alan Hicks, Lizella, GA
# All rights reserved.
#
# Redistribution and use of this script, with or without modification, is
# permitted provided that the following conditions are met:
#
# 1. Redistributions of this script must retain the above copyright
# notice, this list of conditions and the following disclaimer.
#
# THIS SOFTWARE IS PROVIDED BY THE AUTHOR ``AS IS'' AND ANY EXPRESS OR IMPLIED
# WARRANTIES, INCLUDING, BUT NOT LIMITED TO, THE IMPLIED WARRANTIES OF
# MERCHANTABILITY AND FITNESS FOR A PARTICULAR PURPOSE ARE DISCLAIMED. IN NO
# EVENT SHALL THE AUTHOR BE LIABLE FOR ANY DIRECT, INDIRECT, INCIDENTAL,
# SPECIAL, EXEMPLARY, OR CONSEQUENTIAL DAMAGES (INCLUDING, BUT NOT LIMITED TO,
# PROCUREMENT OF SUBSTITUTE GOODS OR SERVICES; LOSS OF USE, DATA, OR PROFITS;
# OR BUSINESS INTERRUPTION) HOWEVER CAUSED AND ON ANY THEORY OF LIABILITY,
# WHETHER IN CONTRACT, STRICT LIABILITY, OR TORT (INCLUDING NEGLIGENCE OR
# OTHERWISE) ARISING IN ANY WAY OUT OF THE USE OF THIS SOFTWARE, EVEN IF
# ADVISED OF THE POSSIBILITY OF SUCH DAMAGE.
#


dovecot_start()
{
echo "Firing up dovecot."
dovecot
}

dovecot_stop()
{
echo "Shutting down dovecot."
killall dovecot
}

dovecot_restart()
{
dovecot_stop
sleep 5 # Give it time to clean-up if it needs it.
dovecot_start
}

case $1 in
'start')
dovecot_start
;;
'stop')
dovecot_stop
;;
'restart')
dovecot_restart
;;
*)
echo "usage $0 start|stop|restart"
esac

Dieser Artikel behandelt wie Unicode (UTF-8) unter Slackware eingerichtet wird - aber auch welche Stolpersteine dabei zu bewältigen sind.


Einleitung

Zuerst einmal, UTF-8 ist ein elektronisches Kodierungsverfahren. Bei der elektronischen Kodierung wird jedem Zeichen ein

Bitmuster zugeordnet. Eine der frühsten Formen der Kodierung war der Morsecode. Mit dem Aufkommen der Computer wurde 1967 ASCII (auch ANSI X3.4-1968) als Standard veröffentlicht. Bei ASCII wird jedem Zeichen ein Bitmuster aus 7 Bit zugeordnet. Bei sieben Bits und zwei unterschiedlichen Zuständen je Bit (0, 1) ergeben sich 128 verschiedene Bitmuster, die auch als die ganzen Zahlen 0–127 (hexadezimal 00–7F) interpretiert werden können.

ASCII kodiert lediglich 128 Zeichen, davon 33 nicht-druckbare sowie folgende 95 druckbare. Enthalten sind das lateinische Alphabet in Gross- und Kleinschreibung, die zehn arabischen Ziffern sowie einige Satz- und Steuerzeichen wie folgt:

Einfacher ASCII-Zeichensatz (7 bit)


Zweck von ASCII

ASCII diente ursprünglich dazu, Schriftzeichen der englischen Sprache darzustellen. Jetzt gibt es aber bekanntermassen nicht nur die englische, sondern viele andere Sprachen, die auch noch unterschiedliche Zeichen zur Darstellung verwenden. Sonderzeichen wie z.B. die deutschen Umlaute können mit ASCII nicht dargestellt werden, hierfür würden 8 bis 16 Bit benötigt.

Ein erster Versuch (ISO 646) das Problem anzugehen führte zu Kompatibilitätsproblemen. Verschiedene Hersteller entwickelten daraufhin ihre eigenen Codes. Der unter IBM PC’s unter DOS verbreitete hiess Codepage 437. Beim späteren Standard ISO 8859 und seinen Varianten wurden 8 Bits zur Codierung verwendet. Der in westeuropäischen Sprachen zur Anwendung kommende Code heisst 8859-1 (latin 1) oder 8850-15 (latin 9), der auch das Euro-Symbol darstellen kann. All diese ISO 8859-Zeichensätze haben den grossen Nachteil, dass sie pro Zeichen nur 1 Byte verwenden und so pro Zeichensatz nur 256 Zeichen darstellen können.


Unicode

Um die Zeichen der unterschiedlichen Sprachen darstellen zu können, wurde der Unicode entwickelt. Er verwendet bis zu 32 Bit pro Zeichen. Damit können über vier Milliarden verschiedene Zeichen unterschieden werden, genug, um bislang alle von der Menschheit verwendeten Schriftzeichen darstellen zu können (sofern sie denn in den Unicode-Standard aufgenommen wurden).

UTF-8 ist eine 8-Bit-Kodierung von Unicode, die abwärtskompatibel zu ASCII ist. Ein Zeichen kann dabei ein bis vier 8-Bit-Wörter einnehmen. Mit der Hilfe von UTF-7 kann nach wie vor auch in sieben Bit kodiert werden. UTF-8 hat sich zum einheitlichen Standard unter den meisten Betriebssystemen, darunter auch Linux, entwickelt.


Warum UTF-8 verwenden?

Die Gründe hierfür sind im Prinzip einfach:

  • Probleme zwischen verschiedenen Betriebssystemen erledigen sich
  • Nahezu alle Zeichen aller Schriftsysteme können nebeneinander dargestellt werden und funktionieren auf allen modernen Rechnern
  • Es gibt im Prinzip keine Konvertierungs- und Darstellungsprobleme mehr
  • Text lässt sich mit besonderen Zeichen (Sonderzeichen) versehen
  • Texte lassen sich in verschiedenen Sprachen und Zeichensystemen verfassen


Problemstellen bei der UTF-8 Umstellung

Probleme können beim Nebeneinanderbestehen alter und neuer Systeme entstehen. Nachstehend die Wichtigsten, es sind aber auch noch andere Varianten denkbar.

  • Wenn im umgestellten System weiterhin auf „alte” Daten zugegriffen wird. Mit „alt” sind Daten gemeint, die mit Nicht-Unicode-Systemen erstellt worden sind
  • Wenn umgestellte und nicht umgestellte Systeme auf die gleichen Daten zugreifen und diese bearbeiten


Betroffen von der Kodierung sind die folgenden Stellen, wobei die ersten beiden als die Schwerwiegendsten zu betrachten sind:

  • Dateinamen
  • Textdateien wie E-Mails, Sourcecode, Scripts, HTML-Files usw. **
  • Kopier- und Einfügaktionen via Zwischenablage (Cut & Paste)
  • Standardinput, -output, -error, Pipes
  • Umgebungsvariablen
  • Remote-Zugriff auf andere Rechner via Telnet, SHS, Modem, Verbindungen über den seriellen Port


** Mit dem Kommando „file dateiname” kann die Kodierung einer bestehenden Datei ermittelt werden.


Ob Textdateien richtig verarbeitet werden, hängt davon ab, ob:

  • Die verwendeten Programme und Betriebssysteme die alte (ISO 8859-x) und neue Kodierungsform (UTF-8) verstehen. Die grafischen Oberflächen wie KDE und GNOME sowie deren Programme können inzwischen gut mit Unicode umgehen
  • Programme die Kodierung via Umgebungsvariable verstehen (z.B. Kommandozeilenprogramme, Terminalemulatoren) oder explizite Angaben in Dokumente auswerten können (z.B. Webbrowser)
  • Problematisch wird es, wenn Programme das Kodierungsverfahren fix bestimmen oder mit Unicode gar nicht umgehen können – problematisch sind:
    • Schriften ohne Unicode-Unterstützung
    • Programme ohne character-rewrite
    • gtk1
    • bash < v.3 & readline < v.5


Viele prominente Programme waren vor nicht allzu langer Zeit noch nicht zu 100 Prozent Unicode kompatibel, darunter:

  • mc
  • xterm
  • mount_smbfs
  • tar


Konvertierung von Dokumenten und Dateinamen

Im Schluss bedeutet die Umstellung auf UTF-8, dass früher oder später Dateinamen und Textdateien auf Unicode umgestellt werden müssen. Dafür gibt es allerdings Programme, die den mühsamen Vorgang unterstützen.


ISO 8859-1 – UTF-8:
iconv -f ISO8859-1 -t UTF-8 „iso8859-1_datei" >"utf8_datei"

UTF-8 – ISO 8859-1:
iconv -f UTF-8 -t ISO8859-1 "utf8_datei" > „iso8859-1_datei"


Eine Konvertierung kann z.B. auch manuell mittels eines Unicode-fähigen Programms wie KWrite erfolgen.

Mit „convmv“ können nicht konforme Datei- und Verzeichnisnamen in UTF-8 umgewandelt werden. In diesem Fall werden das Verzeichnis und die darin befindlichen Dateien rekursiv (-r) konvertiert.


convmv --notest -r -f ISO8859-1 -t UTF-8 <Verzeichnisname


Zusätzlich

UTF-8 „locales” müssen existieren, diese werden aber inzwischen beim kompilieren der „glibc” automatisch erzeugt. Eine Locale ist ein Einstellungssatz, der die Gebietsschemaparameter für Computerprogramme enthält.


Locales

Der Befehl „locale” zeigt die aktuell eingestellten locales an. Der Befehl „locale –a” zeigt alle zur Verfügung stehenden locales an.

Rechner mit Unicode UTF-8:

LANG=de_CH.utf8
LC_CTYPE=“de_CH.utf8”
LC_NUMERIC=“de_CH.utf8”
LC_TIME=“de_CH.utf8”
LC_COLLATE=“de_CH.utf8”
LC_MONETARY=“de_CH.utf8”
LC_MESSAGES=“de_CH.utf8”
LC_PAPER=“de_CH.utf8”
LC_NAME=“de_CH.utf8”
LC_ADDRESS=“de_CH.utf8”
LC_TELEPHONE=“de_CH.utf8”
LC_MEASUREMENT=“de_CH.utf8”
LC_IDENTIFICATION=“de_CH.utf8”
LC_ALL=

Rechner ohne Unicode:

LANG=de_CH
LC_CTYPE=““de_CH”
LC_NUMERIC=“de_CH”
LC_TIME=“de_CH”
LC_COLLATE=“de_CH”
LC_MONETARY=“de_CH”
LC_MESSAGES=“de_CH”
LC_PAPER=“de_CH”
LC_NAME=“de_CH”
LC_ADDRESS=“de_CH”
LC_TELEPHONE=“de_CH”
LC_MEASUREMENT=“de_CH”
LC_IDENTIFICATION=“de_CH”
LC_ALL=


Unicode in Slackware aktivieren

Schritt 1:

Zuerst einmal die Locale (Gebietsschemaparameter) setzen. Dazu die Datei „/etc/profile.d/lang.sh“ editieren und anpassen, z.B.


export LANG=de_CH
in
export LANG=de_CH.utf8 ändern


Eventuell ist es notwendig, einzelne / alle der obigen LC-Variablen ebenfalls mit UTF-8 zu belegen. Mit LC_ALL kann dies einfach für alle Variablen erfolgen.

Falls in Deutschland (de_DE) oder Österreich de_AT entsprechend anpassen


Schritt 2:

Jetzt einen Unicode-fähigen Konsolenfont auswählen. Dazu muss allenfalls die Datei „/etc/rc.d/rc.font“ editiert und angepasst werden. Ich verwende den Font „lat9w-14.psfu“. Die verfügbaren Konsolenfonts sind im Verzeichnis „/usr/share/kbd/consolefonts“ zu finden. Der Konsolenfont kann auch via


/usr/bin/setconsolefont


eingestellt werden.


Als Workaround, aber nicht zu empfehlen: CONSOLETRANSLATION=“8859-1_to_uni“ in der Datei rc.font aktivieren.


Schritt 3:

In „/etc/rc.d/rc.local“ folgendes eintragen:


unicode_start


Schritt 4:

Anpassung für “man” unter Unicode – dafür einen alias in „/etc/profile“ oder ~/.profile anlegen:


alias man='LC_ALL=C man'


Schritt 5:

In der Datei „~./bashrc“ folgendes eintragen:


if [ $TERM = "linux" ]; then
setfont ter-v16n
fi


Schritt 6:

Der X11-Server ist UNICODE-kompatibel – nur die Tastatur muss korrekt konfiguriert werden:

PC-Tastaturen mit Windows- und Kontextmenütaste (105-Tasten) benötigen die Zeile:
Option "XkbModel" "pc105"

PC-Tastaturen ohne Windows-Tasten, zum Beispiel IBM-Laptoptastaturen, benötigen die Zeile:
Option "XkbModel" "pc102"

Die Zeile mit "XkbLayout" definiert das Tastaturlayout. Also:
Option "XkbLayout" "de_DE" => Deutschland
Option "XkbLayout" "de_CH" => Schweiz
Option "XkbLayout" "de_AT" => Österreich


Schritt 7:

Überprüfen und falls notwendig anpassen der Kodierungseinstellungen der verschiedenen Programme unter KDE / GNOME.


Schritt 8:

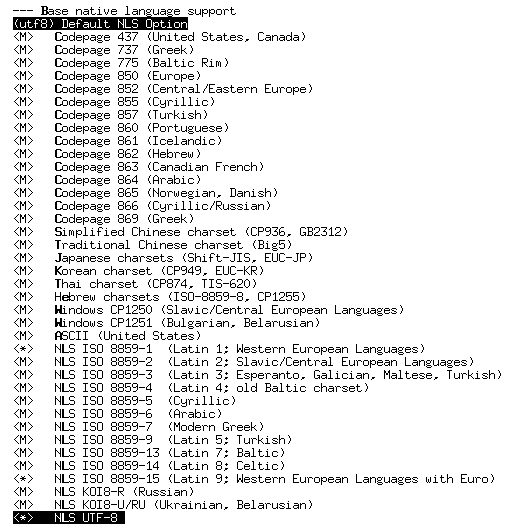
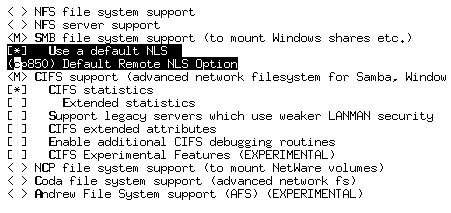
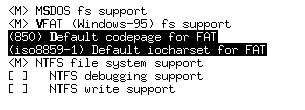
Im Kernel müssen einige Einstellungen für UTF-8 evtl. angepasst werden. Im Kernel (2.6.x) unter >> Filesystems

>> CONFIG_NLS_UTF8
>> CONFIG_NLS_DEFAULT

nls settings

Optional:

CONFIG_SMB_NLS_DEFAULT
CONFIG_SMB_NLS_REMOTE

nls settings

CONFIG_FAT_DEFAULT_CODEPAGE
CONFIG_FAT_DEFAULT_IOCHARSET (nicht auf utf8 setzen)

nls settings


Zusatz: Kodierung in Terminalemulatoren

Werden Programme in einem Terminalemulator ausgeführt, tritt der Terminalemulator quasi als Vermittler auf. Der Terminalemulator muss ermitteln, in welcher Kodierung Eingaben dem Programm übergeben werden müssen und in welcher Kodierung die Ausgaben erfolgen resp. zu erfolgen haben. Es können Probleme auftreten, wenn:

  • wenn bei einer Remote-Verbindung wie z.B. SSH ein entfernter Rechner in einem lokalem Terminalfenster aufgerufen wird und sie unterschiedliche Kodierungen verwenden
  • Wenn sich die Kodierung der Daten von der eingestellten Kodierung unterscheiden


Bei der Problembehandlung muss beachtet werden, dass Kommandozeilenprogramme die Ein- und Ausgabekodierung oftmals über die LANG-Variable steuern. Es ergibt sich also ein Zusammenspiel bei der Verarbeitung der Daten im Terminalemulator und im Kommandozeilenprogramm.


UTF-8 fähige Texteditoren

Eine Auswahl an Texteditoren, die UTF-8 verstehen sind:

  • kwrite
  • kate
  • vi(m)
  • emacs
  • xemacs


Problemlösungsansätze

Daten die verarbeitet werden sollen liegen nicht im Unicode-Format vor, werden aber vom Terminalemulator als Unicode identifiziert:


LANG=de_CH konsole &
export LANG=de_CH


Dateinamen in einem Verzeichnis ansehen, die Zeichen in ISO 8859-Kodierung enthalten:


LANG=de_CH luit ls


Inhalte von Textdateien ansehen, die ISO8859-Zeichen enthalten:


LANG=de_CH luit cat „dateiname“


Remotezugriff auf einen Rechner mit ISO 8859 Kodierung:


In einem Terminalfenster das auf Unicode eingestellt folgendes eingeben:
LANG=de_CH luit ssh „rechnername“ – Alternative:
LANG=de_CH konsole &
ssh „rechnername“


Begriffserklärungen

ASCII

Zu den ASCII-Zeichen gehören die lateinischen Buchstaben, Ziffern und eine Vielzahl von Sonderzeichen (keine Umlaute). Bei ASCII wird jedem Zeichen ein Bitmuster aus 7 Bit zugeordnet. Bei sieben Bits und zwei unterschiedlichen Zuständen je Bit (0, 1) ergeben sich 128 verschiedene Bitmuster, die auch als die ganzen Zahlen 0–127 (hexadezimal 00–7F) interpretiert werden können.


ISO8859

Die vor Unicode gebräuchliche Codierungsart für Textzeichen. Es handelt sich um einen ein Byte Code, weshalb auch nur im Zahlenbereich von 0 bis 255 codiert werden kann. In der Praxis stehen allerdings weniger als die 256 Möglichkeiten zur Verfügung, da einige der Kombinationen für Steuerungszeichen verloren gehen. Da dies nicht ausreicht, wurden Zahlenwerten grösser als 127 mehrere Bedeutungen zugewiesen und jeweils regional bedingt in einem Standard ISO 8859-x festgelegt. Die richtige Interpretation erfolgte dann durch die Sprachauswahl in der LANG-Variable.


UTF-8
Jedem in der Welt vorkommenden Textzeichen und Textsymbol ist im Unicode-Standard ISO-10464 ein eindeutiger Code zugeordnet. Vor der Nutzung muss dieser Code aber noch „verpackt” werden – bei UTF-8 handelt es sich um eine solche standardisierte Verpackung von Unicode-Zeichen.

Slackware provides many out of the box kernels optimized to be supporting a vast of various hardware configurations. Drawback is these kernels are not optimized for a specific hardware configuration or to be running on best performance. Enough reasons for a customized kernel.

The good news is, doing so is quite easy on Slackware, compared with other major Linux distributions. This article covers important steps building a customized kernel for a Slackware box


General conditions

  • This article is about kernel 2.6.x. I have ported my system to 2.6 years ago, although Slackware was consistently using kernel 2.4. Kernel 2.6 became standard in Slackware release 12.0
  • Always have a functioning kernel (e.g. standard Slackware kernel) you can boot!
  • As a rule of thumb, only compile core functions statically in the kernel, use kernel modules for the hole rest. This way your kernel keeps thin and you become more flexible
  • If you are unsure about your hardware configuration, activate all modules in a specific kernel section. Your kernel will load any module needed in order to support your hardware configuration. Doing so is in general a good idea. The only drawback is that it will take more time to compile a large quantity of modules
  • Don't expect building your own kernel a matter of ten minutes (at least not for the first time). It will take quite some time, as there are many many kernel options to go trough
  • Consider to switch to the "GRUB" bootloader (no prerequisite). See specific article in doing so


Here is how it goes

Step 1:

Make yourself comfortable with the hardware configuration of your box. Look into /sys and /proc. Have a look on your vendors site and / or consult your mainboard manual. You should at least know:

  • CPU model
  • Chipset
  • SATA / IDE specifications
  • Network
  • Video
  • Sound


Examine your PCI configuration:


lspci


Verify loaded modules


lsmod


Step 2:

Grab the 2.6.x kernel you want from www.kernel.org. Grab also the corresponding .sign file.


Step 3:

Verify the kernel file signature:


gpg --verifiy linux-2.6.23.16.tar.bz2 linux-2.6.23.16.tar.bz2.sign


Step 4:

Copy the linux kernel source file to /usr/src and extract it.


cp linux-2.6.23.16.tar.bz2 /usr/src
tar xvfj linux-2.6.23.16.tar.bz2


Step 5:

If you never have customized a kernel before, you must now go trough hundreds of kernel parameters. Nevertheless, it is worth the effort. Remember:

  • Always have a functioning kernel (e.g. standard Slackware kernel) you can boot!
  • Only compile core functions statically in the kernel, use kernel modules for the hole rest
  • If you are unsure about your hardware configuration, activate all modules in a specific kernel section. Your kernel will load any module needed in order to support your hardware configuration


Start kernel configuration:


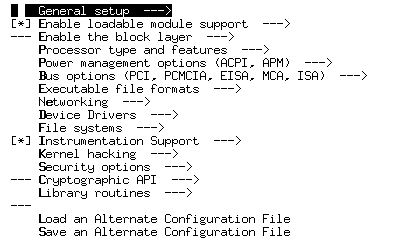
make menuconfig


Dont't be premature, these are the top level adjustments, there are hundreds of sub-options. If in doubt what to do, have a look onto your running kernel configuration (e.g. a standard Slackware kernel).

kernel

When finished, save configuration and exit. Type:


make bzImage && make modules && make modules_install


Step 6:

Copy the kernel and system map to the /boot folder.


cp arch/i386/boot/bzImage /boot/vmlinuz_2.6.23.16
cp System.map /boot/System.map_2.6.23.16


Modules already have been installed to /lib/modules


Step 7:

Create some symlinks.

In /usr/src type:


ln -s linux-2.6.23.16 linux


In /boot type:


ln -s System.map_2.6.23.16 System.map
ln -s vmlinuz_2.6.23.16 vmlinuz (optional)


Step 8:

Adjust your boot loader.

If you are a LILO user type "lilo"

if you are using GRUB adjust your /boot/grub/menu.lst file


Step 9:

Reboot!

If you utilize specific modules, e.g. a graphic driver or VMware workstation modules, you have to recompile them.


Step 10:

Delete unnecessary sources in:

  • /usr/src
  • /lib/modules
  • /boot


Upgrade your customized kernel

This is much more easier than customize a kernel for the first time. We distinguish:

  • Kernel patch upgrade, e.g. 2.6.23.15 to 2.6.23.16
  • Kernel minor release update, e.g. 2.6.23 to 2.6.24

You can do both by downloading the new full release or by just applying the a patch.


Step 1:

Kernel patch upgrade:

If you start with a new full release, extract it and then copy the .config file from the old kernel source tree into the new one. Type:


make oldconfig


If you just apply the patch, you don't have to do this.


Minor release update:

Proceed like described above, but there is a difference. As a new kernel version introduces new options not known to the previous kernel and its .configure file, you must set up these options first. To do so, simply answer the questions the "make oldconfig" scripts is going to ask you. Answer them with yes (y), no (n) or (m) for module.


Step 2:

Build your new kernel and modules.


make bzImage && make modules && make modules_install


Then proceed as described above.

Slackware is a Linux distribution created by Patrick Volderding and maintained by Slackware Linux Inc. It was one of the earliest distributions available, and is the oldest currently being maintained. Slackware is an acronym for stability, extendibility and simplicity. It is highly adaptable and appreciated within the community for its capability for being customizable. Slackware aims to be the most UNIX-like Linux distribution.


slackwareHistory

Slackware is originally based on the Softlanding Linux System (SLS), which was very popular amongst the original Linux distributions, ancient times ago. SLS was on top, until the developers decided to change the executable format from a.out to ELF. Many users not happy with this decision, Patrick Volkerding modified a current SLS version and released it under the name “Slackware”. The first release, 1.0, appeared on 16 July 1993. This release was fitting on several 3 ½” floppy disks but was also available by anonymous FTP. Things change fast, Slackware quickly replaced SLS as the dominant Linux distribution at the time.

Based on Slackware’s release numbering approach, the distribution seemed to be out of date compared to other distributions such as Red Hat. To show that Slackware was up-to-date as other Linux distributions, Patrick decided 1999 to increment the release number from 4 to 7, which was equal to release numbers of other Linux distributions at the time.


Conservative approach

Slackware follows a pretty conservative approach in different aspects, so to say with software to include in the software tree, inclusion of new libraries and sometimes major software updates, design or architecture changes. As a fact, one will not find software included with many other Linux distribution, such as OpenOffice, Acrobat Reader and some examples more. My assumption is that Patrick does not want to include any software not fully under the GPL license. Nevertheless, it is everybody’s free will to install any software one is desiring on a Slackware box. Patience was also required with Kernel 2.6 or Apache 2.x, which were officially introduced in Slackware 12, although stable since quite a while. Patrick also seems to have a special relation to the LILO boot loader, which in my humble opinion should be replaced with the grub loader. At least grub is available as package (amongst many others) in the Slackware “extra” tree. While these examples probably sound like a disadvantage, they may in fact be the reasons why Slackware is probably the most stable and reliable distribution available.

Since 2005 KDE can be seen as the main desktop environment in Slackware, as GNOME was removed from the current tree. There are still many other window managers available in Slackware such as Xfce, Blackbox and Fvwm. Nevertheless, GNOME is still available for Slackware offered by several community-based projects.


Slackware philosophy

The “Keep It Simple, Stupid” philosophy could be a suitable designation for Slackware. In this context, “simple” refers much more to the viewpoint of the system design, rather than ease of use. To be honest, Slackware is probably not a Linux beginners choice. There are other Linux distributions available a beginner should start with. Slackware provides pretty little GUI tools to install and configure the system. Most software in Slackware has to be configured using the mechanisms provided by the specific software. Nevertheless some important tasks can be done by a Slackware specific configuration GUI. If there was a little more help with partitioning (one must do it using fdisk or cfdisk) even a beginner could install Slackware. As a fact, critics consider Slackware not to be user friendly and difficult to learn. From a Slackware believers viewpoint, the other side of the coin is Slackware’s flexibility, extendibility, stability and transparency. Once one is no longer a Linux beginner and want to do things more than “out of the box”, the decision to move over to Slackware may be a hard, but wise one.


Architecture support

Slackware is primarily developed for the x86 hardware architecture. However, Slackware has previously been ported to SPARC and Alpha architectures. As of 2005, there is an official port to the S/390 architecture. This means that this port is undergoing the same heavy development and testing experiences as x86. Official ports (will attempt) to include the same software, configuration scripts, and so forth. There are also unofficial ports to the ARM , Alpha, SPARC PowerPC and x86-64 architectures.


Release management

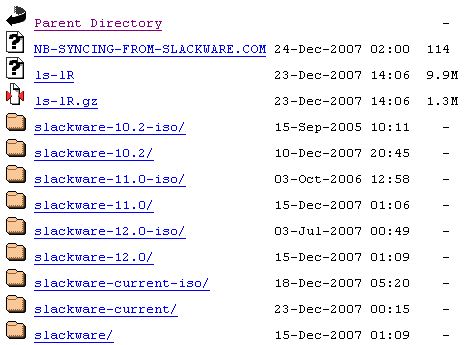
To be informed on the latest stable release for x86 go to www.slackware.com. Slackware uses two main trees for its release management. There is always as “slackware” directory, which is actually a shortcut pointing to the directory holding the latest stable release. This is the version that should be used in a productive environment. The second is the development / testing tree, also called “current”, which holds the version next to be released.


slackware tree


If you want to download the latest version, either use a tool capable of doing reverse downloads such as “ncftp” or download the ISO image. You can also use Bit torrent go get your copy of Slackware. It is always a good idea to use a mirror, a maintained list is published at the above site.

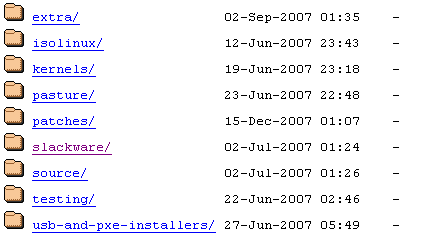
As mentioned before, the “slackware” directory points to the directory holding the latest stable release. If you change inside that directory, you will, again, see a directory named “slackware”, amongst others. This directory contains the categorized Slackware packages (see info below on Slackware’s package management). This directory also holds (not pictured here) various Readme's.


slackware tree


Other important directories are:

  • extra - this one contains various additional software package, e.g. "grub" or "slackpkg". If you are looking for something, you should first have a look into it
  • isolinux - contains all the files necessary to make a bootable Slackware install DVD - see README.TXT
  • pasture - things that have been retired from Slackware, but might still be useful to some people
  • patches - security fixes for the latest stable release. To be informed on security issues subscribe to the mailing list and/or RSS feed
  • source - source code for all the software contained in Slackware, categorized in the "slackware" directory style
  • testing - software under examination eventually to be included in the next release


Slackware package management

Slackware's package management differs from mechanism provided by other main distributions. Slackware packages are gzipped tarballs with filenames ending with .tgz. Package management can install, remove and upgrade packages. Management of dependencies is by default users obligation, which has to ensure all system libraries and programs required by a new package are in place. If any of these are missing, there may be no indication until one attempts to use the newly installed software.

Package tools in place by default are:

  • pkgtool - provides a basic GUI for related package management tasks
  • installpkg - install packages
  • removepkg - remove packages
  • upgradepkg - upgrade a already installed package with a new version.


Beside upgradepkg is also capable of installing new packages (--install-new), reinstall a package of the same version (--reinstall) or to generate a report about which packages would be installed or upgraded but don't actually perform the upgrades (--dry-run)

A package contains the files that form part of the software being installed, as well as additional files for the benefit of the Slackware package manager. The files that form part of the software being installed are organized such that, when extracted into the root directory, their files are placed in their installed locations. The other files are those placed under the install/ directory inside the package.

The files "slack-desc" and "doinst.sh" are the two files commonly to be found in the install/ directory of a package. These files will not be copied into the filesystem, but supporting the installation process. The slack-desc file is a simple text file which contains a description of the package being installed. This is used when installing a package or viewing it using package management tools. The doinst.sh file is a shell script which is usually intended to run commands or make changes which could not be best made by changing the contents of the package. This script is run at the end of the installation of a package.

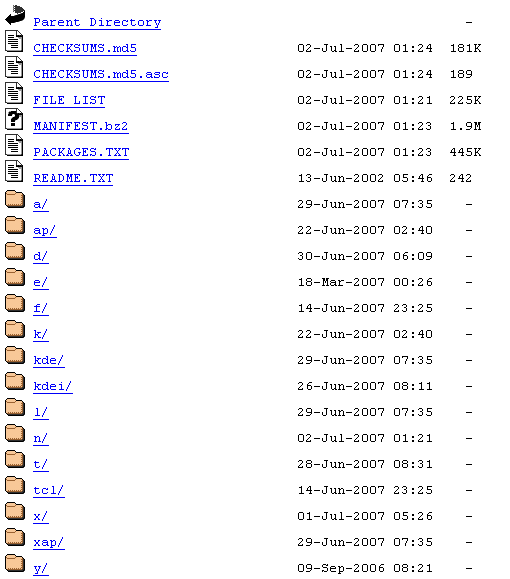
As mentioned above, the slackware subdirectory contains the categorized packages as follows:

package tree


  • a - the base system. Contains enough software to get up and running and have a text editor and basic communications programs
  • ap - various applications that do not require the X Window System
  • d - program development tools. Compilers, debuggers, interpreters, and man pages. It's all here
  • e - GNU Emacs
  • f - FAQs, HOWTOs, and other miscellaneous documentation
  • k - the source code for the Linux kernel
  • kde - the K Desktop Environment. An X environment which shares a lot of look-and-feel features with the MacOS and Windows
  • kdei - language support for the K Desktop Environment
  • l - system libraries
  • n - networking programs. Daemons, mail programs, telnet, news readers, and so on
  • t - teTeX document formatting system
  • tcl - the Tool Command Language, Tk, TclX, and TkDesk
  • x - the base X Window System
  • xap - X applications that are not part of a major desktop environment
  • y - Games


Package series or even single packages can easely be chosen during installation. Packages can be installed, removed or upgraded at any time using the tools depicted above.


Extended package management with "slackpkg"

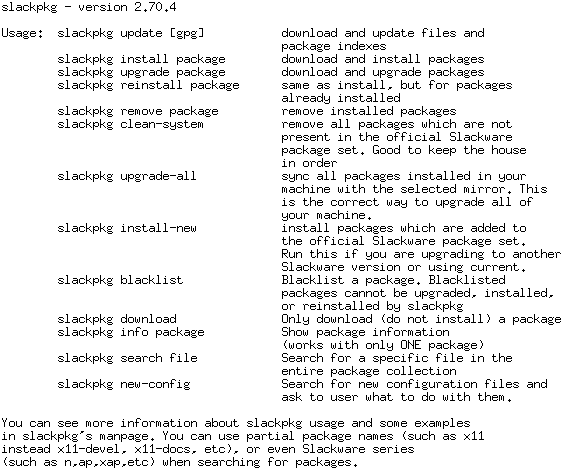
Slackware 9.1 introduced the slackpkg tool as extra package but it is not installed by default. While Slackware itself does not incorporate tools to automatically resolve dependencies for the user by automatically downloading and installing them, the slackpkg tool provides extended and very useful functions.

Simply install it with the installpkg command from the extra directory if you want to use it. Slackpkig provides a variety of functions as pictured below.

slackpkg

Prior of using it, the slackpkg configuration file "slackpkg.conf", located in /etc/slackpkg, has to be reviewed and adapted as needed. In the same directory you will find a file called "mirrors" - edit this file and uncomment the Slackware mirror (just one) closest to you. Be aware that this file contains sections for prior releases too. Find the mirror in the proper section which equals to the release you are using. Once done, you are ready using slackpkg.

Slackpkg provides all the functions supplied by the tools mentioned earlier. In addition, especially pay attention to the following options:

  • clean-system
  • upgrade-all
  • install-new
  • blacklist
  • download
  • info packag


Alternatively, NetBSD's pkgsrc provides support for Slackware, among other UNIX-like operating systems. pkgsrc provides dependency resolution for both binary and source packages.


Third-party

Third-party Slackware packages are provided by linuxpackages.net and slacky.eu. GNOME SlackBuild, Dropline GNOME and GWARE are projects intended to offer Slackware packages for GNOME. These projects exist because Slackware does no longer officially include GNOME, but a large number of users would prefer to have GNOME as a choice. Another project for building GNOME is the SlackBot automated build script system.

In addition to the unofficial package repositories listed above, there is a project called SlackBuilds.org whose goal is to provide build scripts for compiling add-on software and creating Slackware packages of it.

Keep on slackin!

Page 2 of 2